Deploy fully configured VMs in minutes on Google Cloud, using gcloud CLI and cloud-init
Rajan Patel
on 13 September 2023
Tags: cloud-init , FIPS , Google Cloud , Landscape
Make reusable deployment templates for Landscape and other applications

Every public cloud provider has a templating mechanism to deploy fully configured applications. For anyone interested in a vendor-neutral approach that works on major public clouds, cloud-init offers a good solution. Cloud-init makes your work re-usable regardless of the clouds you deploy to. It’s an open source configuration automation solution for Linux, which performs steps at various stages of a single machine’s boot up. In this article, I will explain how you can use cloud-init for re-usable single machine deployments. We will use cloud-init patterns to deploy Landscape, but the same process can be repurposed to deploy other applications.
Landscape is Canonical’s systems management solution for individuals or organisations that use Ubuntu. It provides access to a wide range of administrative functions that encompass inventory, automation, hardening, compliance, reporting, and software distribution. In the context of Ubuntu on public clouds, Landscape manages fleets of machines anywhere, including multi-cloud and hybrid-cloud configurations.
This article is divided into two parts. First, we will cover how to set up Google Cloud CLI. Then, we will cover how to use cloud-init configuration templates. Let’s first outline the role of these tools.
Part 1: The Google Cloud CLI: The Google Cloud CLI includes the gcloud command line utility, which allows you to interact with Google Cloud services and manage your resources. Any task related to Google Cloud infrastructure, from provisioning and deployment, to management, can be accomplished with gcloud.
Part 2: cloud-init: cloud-init is universally used by all major public clouds. It is also used by MAAS, Canonical’s bare metal provisioning solution, and also in open source cloud computing platforms, like OpenStack. Cloud-init serves as a common thread between all clouds, and while each cloud may have its own templating conveniences, using cloud-init affords you the luxury of multi-cloud support, and makes deployments between various cloud providers a uniform experience.
By the end, you will have learned how to launch an Ubuntu virtual machine on Google Cloud, and have a fully configured Landscape deployed on it. The subsequent steps assume you have a Google Cloud account created, and are performing these steps in a bash shell with the curl package installed.
Part 1: Google Cloud CLI
Installing and using the Google Cloud CLI on your system can be condensed into a simple 3 step process:
Step 1: Install gcloud, conveniently available as a snap
Installing the Google Cloud CLI as a snap package is well suited for the goals of this article. If you already have the Google Cloud CLI installed, this step can be skipped:
sudo snap install google-cloud-cli --classicStep 2: Connect gcloud with your Google Cloud account
Proceeding with this step assumes you have already created an account on cloud.google.com and have logged into the console.cloud.google.com web interface at least once, to create a project. If these prerequisite activities have been satisfied, you can initialise the Google Cloud CLI:
gcloud initYou will be prompted with a Yes/No login prompt. Answer affirmatively, and visit the authentication link using your favourite browser.
Welcome! This command will take you through the configuration of gcloud.

Your current configuration has been set to: [default]

You can skip diagnostics next time by using the following flag:
  gcloud init --skip-diagnostics

Network diagnostic detects and fixes local network connection issues.
Checking network connection...done.
Reachability Check passed.
Network diagnostic passed (1/1 checks passed).

You must log in to continue. Would you like to log in (Y/n)?  y

Go to the following link in your browser:

https://accounts.google.com/[redacted]
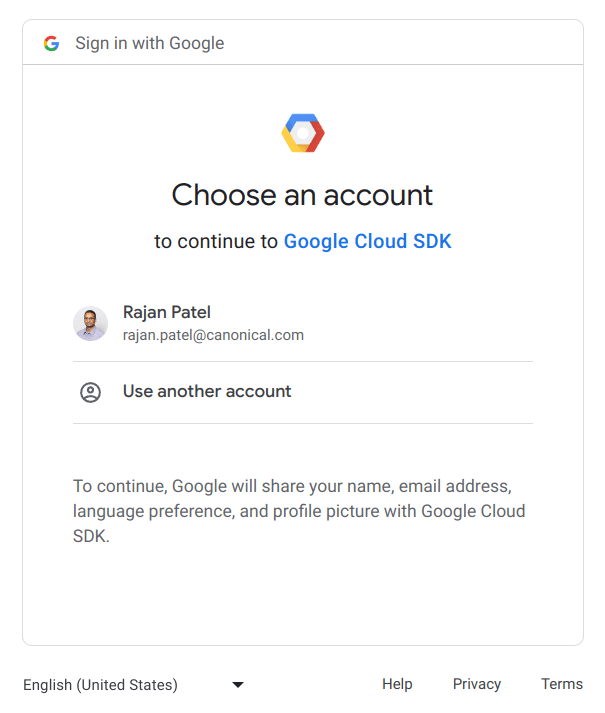
Visiting the link will take you through the following Google login experience, click on the email address associated with your Google Cloud account, click “Use another account” to sign in with the correct account.

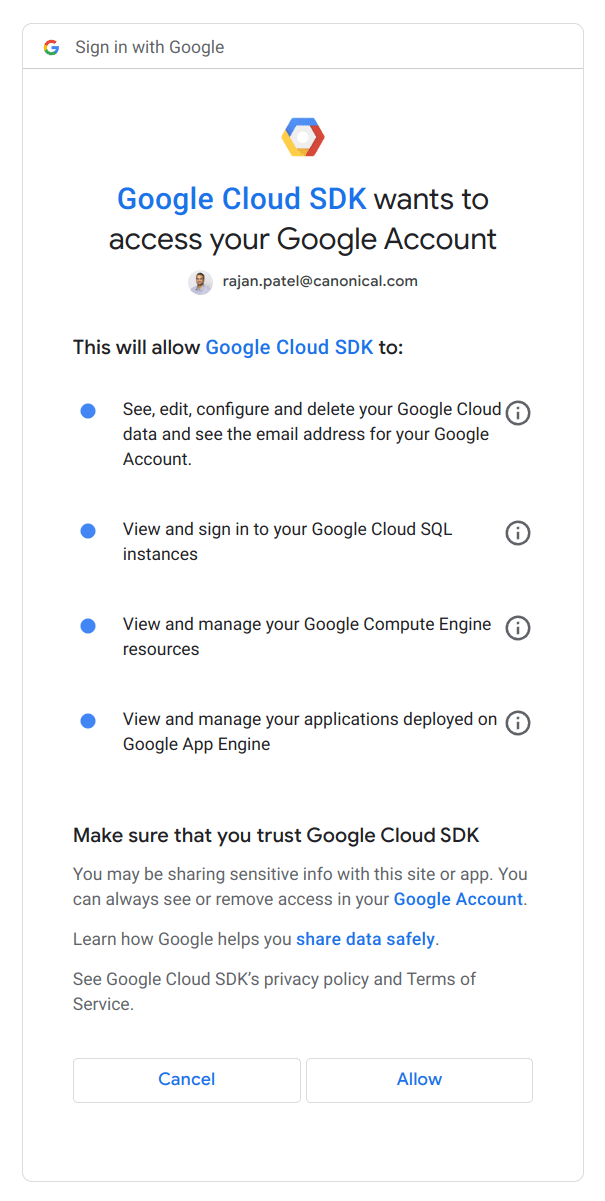
Next, grant Google Cloud SDK the permissions to function correctly, by clicking “Allow”.

Click “copy” and paste this authentication string from your clipboard into the terminal window where the gcloud init process is running:

Upon successful completion of the gcloud init process, you will be presented with the following output:
You are now logged in as [your@email.com].
Your current project is [None].  You can change this setting by running:
  $ gcloud config set project PROJECT_ID
Step 3: Provision resources and deploy
Now that you have authenticated, you can list what projects are in your account with this command:
gcloud projects listThe PROJECT_ID is of interest, in the example below, the value for it is your-project-id:
PROJECT_ID        NAME              PROJECT_NUMBER
your-project-id   your-project-name 12345678910
The PROJECT_ID value will be used often, so we will set your-project-id as a value of the PROJECT_ID shell variable:
PROJECT_ID=your-project-idConnect gcloud to this PROJECT_ID, which will be where the Landscape virtual machine is going to be launched:
gcloud config set project $PROJECT_IDThe available cloud zones and cloud regions where virtual machines can be run, can be listed with this command:
gcloud compute zones listThis is partial output shows a table with the values that will be used in this article:
NAME                       REGION                   STATUS  NEXT_MAINTENANCE  TURNDOWN_DATE
us-east1-b                 us-east1                 UP
The zone and region values are stored as environment variables, because they are used in several of the subsequent steps.
ZONE=us-east1-b
REGION=us-east1
Landscape will benefit from a static IP address assignment. A DNS record called an A record is responsible for pointing the fully qualified domain name (FQDN) to the Landscape Server’s IP address. When using a static IP address, the A record doesn’t have to be updated every time the dynamic IP changes. Reserve a static IP address, and label it landscape-external-ip, in the appropriate region:
gcloud compute addresses create landscape-external-ip --region=$REGIONTo view the addresses you have created:
gcloud compute addresses listThen copy the IP address and set it as the A record value for the domain (yourdomain.com) or subdomain (landscape.yourdomain.com) which will serve as the fully qualified domain name. It is best to verify the A record using nslookup. In my example, my FQDN is landscape-fips.rajanpatel.com and my static IP address is 34.139.251.121:
nslookup landscape-fips.rajanpatel.comThe output will appear as follows:
Server:		127.0.0.53
Address:	127.0.0.53#53

Non-authoritative answer:
Name:	landscape-fips.rajanpatel.com
Address: 34.139.251.121
If the address value in the nslookup output matches the value of the landscape-external-ip static IP address, the LetsEncrypt SSL provisioning step defined in the cloud-init configuration automation template will succeed.
Part 2: cloud-init
Next, choose which of the two cloud-init configuration automation template files that best suits your needs. In the Landscape Scripts Github repository there are two Landscape Quickstart cloud-init configuration templates: cloud-init-quickstart.yaml and cloud-init-quickstart-fips.yaml.
Set the appropriate IMAGE_FAMILY variable based on which cloud-init configuration you choose:
- cloud-init-quickstart.yaml is suitable for anyone, to use this file run these commands:
curl -s https://raw.githubusercontent.com/canonical/landscape-scripts/main/provisioning/cloud-init-quickstart.yaml -o cloud-init.yaml
IMAGE_FAMILY=ubuntu-pro-2204-lts- cloud-init-quickstart-fips.yaml is suitable for those interested in deploying FIPS-enabled machines, as it will deploy a FIPS-compliant Landscape. FIPS is the cryptographic hardening posture adopted by the United States government. To use cloud-init-quickstart-fips.yaml run these commands:
curl -s https://raw.githubusercontent.com/canonical/landscape-scripts/main/provisioning/cloud-init-quickstart-fips.yaml -o cloud-init.yaml
IMAGE_FAMILY=ubuntu-pro-fips-2004-lts
Open the downloaded cloud-init.yaml file in an editor, and determine what configuration parameters need to be changed between lines 4 and 32. The HOSTNAME on line 16 and DOMAIN on line 19 must be changed at a minimum. Updating EMAIL on Line 9, and adding your SendGrid API key on Line 29 as the SMTP_PASSWORD are optional, but strongly recommended.
The following command will launch a machine with generally suitable resource specifications:
gcloud compute instances create landscape \
    --zone $ZONE \
    --machine-type=c3-standard-4 \
    --address landscape-external-ip \
    --tags http-server,https-server \
    --boot-disk-size 200 \
    --image-family $IMAGE_FAMILY \
    --image-project ubuntu-os-pro-cloud \
    --metadata-from-file user-data=cloud-init.yaml
To achieve cost savings, it is possible to downgrade the machine-type value from c3-standard-4 to e2-medium, and to also downgrade the boot-disk-size value from 200 to 20. It is worth noting the e2-medium machine is a shared compute resource, because using it may result in temporary and sporadic instability of the Landscape dashboard, this size machine should only be used for proof-of-concepts and limited testing.
To see all the virtual machines in this project, new projects will only show the just-provisioned Landscape machine:
gcloud compute instances listTo observe the cloud-init process on the Landscape machine, it is possible to tail the cloud-init-output.log file:
gcloud compute ssh landscape --zone $ZONE --command "tail -f /var/log/cloud-init-output.log"First time gcloud users will be prompted for a passphrase twice, which can be left blank. Press Enter twice to proceed:
WARNING: The private SSH key file for gcloud does not exist.
WARNING: The public SSH key file for gcloud does not exist.
WARNING: You do not have an SSH key for gcloud.
WARNING: SSH keygen will be executed to generate a key.
Generating public/private rsa key pair.
Enter passphrase (empty for no passphrase):
Enter same passphrase again:
At some point, cloud-init may reach a stage where a reboot will be required, due to security patches. If the IMAGE_FAMILY specified earlier contained all the security patches, this reboot step may not occur:
2023-08-20 17:30:04,721 - cc_package_update_upgrade_install.py[WARNING]: Rebooting after upgrade or install per /var/run/reboot-requiredGiving the machine a moment to reboot and repeating the gcloud compute ssh command is necessary to continue observing the cloud-init-output.log file. When the log file is no longer getting new information appended to it, and the cloud-init process is complete, tail will continue monitoring it for changes. You know cloud-init has completed when you see 2 lines similar to this:
cloud-init v. 23.2.2-0ubuntu0~20.04.1 running 'modules:final' at Sun, 20 Aug 2023 17:30:43 +0000. Up 25.14 seconds.
cloud-init v. 23.2.2-0ubuntu0~20.04.1 finished at Sun, 20 Aug 2023 17:30:56 +0000. Datasource DataSourceGCELocal.  Up 37.35 seconds
Press CTRL+C to terminate the tail process in your terminal window, the next steps will require a web browser.
Configure Landscape
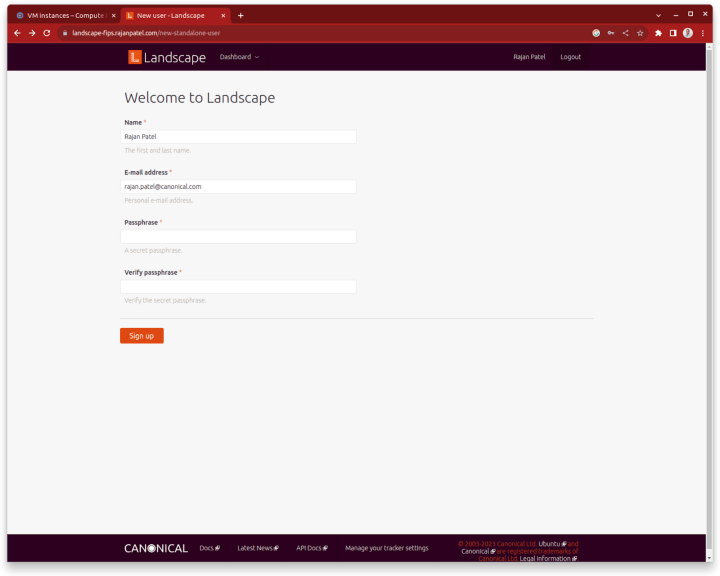
At this stage, it is possible to visit the Landscape dashboard by typing the FQDN of the Landscape virtual machine into a browser window. Provide a name, email address, and password for the first global administrator on the machine.

If the email address Landscape sends emails from should not be a subdomain based on the machine’s hostname, remove the hostname (highlighted in the screenshot below), or make the appropriate correction. This is an optional step, SendGrid is not sensitive to the hostname being set in this field, but other email service providers may be.

Alerts and Administrator invitations sent via email are less likely to fail SPF or DMARC checks if the system email address is configured in a way the email service provider expects. If the email service provider sends emails which fail SPF and DMARC checks, mail delivery can be delayed or miscategorized as spam.
Cleanup step to safeguard secrets
cloud-init scripts are provided in a custom metadata key named user-data, which is consumed during instance creation, and is executed when the instance starts. Sensitive information such as API keys aren’t suitable to leave visible in plaintext within the custom metadata of the virtual machine, or in the cloud dashboard. Once the cloud-init-output.log prints out a successful “finished” message, and a reading of how many seconds the process took to complete, it is safe to delete the cloud-init user-data key. Warning: running this before the cloud-init process completes would result in an installation failure.
gcloud compute instances remove-metadata landscape --zone $ZONE --keys=user-dataHow to perform a complete teardown
Now that you have successfully launched an application to Google Cloud using cloud-init and the gcloud command line utility, you may be wondering if it’s just as easy to delete everything. The gcloud tooling makes both provisioning and teardown a straightforward process. It is possible to delete the virtual machine and release the static IP address with the gcloud command line utility, effectively reversing all the provisioning steps outlined in Step 3, above.
The order of operations is important, the virtual machine must be deleted first:
gcloud compute instances delete landscape --zone $ZONEOnce a machine is no longer using the static IP address, the static IP address can be released:
gcloud compute addresses delete landscape-external-ip --region $REGIONConclusion
Deploying and managing Landscape on the Google Cloud has been made remarkably efficient through the use of the gcloud CLI and cloud-init automation. This article has laid out shortcuts and automations for streamlining the installation process. The Landscape cloud-init files linked from the Landscape Scripts Github repository showcase cloud-init best practices.
Cloud-init’s universal compatibility across clouds and infrastructure software makes it useful even when the underlying infrastructure changes. Migrating single machine deployments between different public clouds or on-premises will be vastly simplified with cloud-init templates. This Landscape example can be repurposed for deploying any other applications, ranging from game servers to web servers, or anything else. Now that you have learned how to deploy an application and apply cryptographic hardening to a machine using cloud-init, you can deploy and configure other applications following the same process. Assuming a Landscape deployment without redundancy is suitable for your needs, it is ready to use. If you have requirements for high availability, please reach out to us to learn about deploying Landscape with Juju, Canonical’s open source orchestration engine.
If you want to learn more
Talk to us about your systems management challenges in public cloud, or on-premises.
Talk to us today
Interested in running Ubuntu in your organisation?
Newsletter signup
Related posts
Meet our Public Sector team at Technet Augusta 2024
We’re excited to announce our participation in Technet Augusta 2024 from 19 to 22 August.
Manage FIPS-enabled Linux machines at scale with Landscape 23.03
You or your organisation are tasked with hardening your workstations and servers, where do you begin? Installing Ubuntu and applying all the security patches...
Ubuntu Confidential VMs Now Available on Google Cloud A3 with NVIDIA H100 GPUs
Organizations are racing to harness the transformative power of AI, but sensitive data privacy and model security remain critical roadblocks. What if you...
