What’s round and sticky and how you can make some!
Canonical
on 30 June 2011
Tags: Design , illustration , inspiration , orange , stickers , Ubuntu Desktop
Some of you out there may have already seen that funky print shop MOO.com just launched a new product, round stickers. This means that you can now upload round images and make lovely bespoke stickers in a pack of 52. Full disclosure before I start to say that I used to work at MOO.com which is why it appealed to me to play with their product. Anyway, as soon as I saw these new stickers I thought of one thing and that thing was pictograms!
Our pictograms are a beautiful library of icons that help us illustrate the Ubuntu world and they’re all round.
“Perfect-o!”
I thought, I’ll grab the PNGs from design.canonical.com/brand, upload them and be handing out stickers around the office in no time!
But … horror of horrors … the pictograms we’ve made and put online are all 113 x 113 px and MOO recommend at least 472 x 472 px and their uploading tool doesn’t yet accept SVGs which left me with a big problem. I wanted to print 52 stickers and didn’t really want to manually open 52 images and scale them in Inkscape and resave them.
“I need to automate this!”
So here’s what I did to get my lovely pack of stickers made and what you can do to make your own pack of pictogram stickers.
What you will need …
- Some vector pictograms like the one’s helpfully zipped up for you on design.canonical.com
- Inkscape – Ubuntu users can click this link to install it. It’s available on a host of platforms.
- Gimp – Again Ubuntu users can click this link to install and again it’s probably available for your system too.
- David’s Batch Processing plugin for gimp
- Bow tie – this is optional but they are cool …
Got it all? Right! Let’s get cracking!
So unzip your pictograms and open up Inkscape. Then select all the ones you’re going to want to resize and drag them from the folder window into Inkscape.
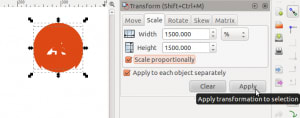
Next you want to make these tiny little objects bigger so to do this select Object from the top menu bar and choose Transform from that drop down. Make sure you have all the pictograms selected and click on the scale tab.
Because we want to give MOO some nice big images let’s make them massive. I’ve made mine scale proportionally by 1500% and make sure you apply this to each object. Hit apply and zoom out because your screen is now filled with big orange shapes.
Next up we want to add a bit of space around our objects. Whenever you print something you need to provide an area around the image known as bleed. This will allow for the fact that your small item is being printed on a large piece of paper or card and being cut out and you want your image to go right up to the edge. This will become clearer when you upload your PNGs.
To add the bleed around mine I’ve cheated and added an invisible stroke to each object – there may well be a better way to do this but I’m excited and this is how I’ve made it work. You can do it my way by right clicking on your selection of all your pictograms and choosing Fill and Stroke.
First of all select the last tab Stroke style and enter a width of say 200px .Then select the second tab Stroke paint and click the second box in to choose Flat colour. This will immediately cover your lovely pictograms in a thick black line, not at all what we’re after, so reduce the alpha channel, the fourth bar in that pane to 0 to make our stroke transparent.
SAVE! You never know!
Now we need to be able to see all our lovely pictograms before we export them as PNGs. To do this click again on Object in the top menu and choose Align and Distribute from the bottom of that menu. This will bring up another panel with a section called Remove overlaps. I entered 100 into the vertical and horizontal just to give a little room around each object. Then click the icon next to these boxes and behold in amazement as all your pictograms sort themselves into an orderly group!
AMAZING!
Now we’re ready to export our pictogram PNGs. To do this click on File and choose Export Bitmap from the menu. You want to export each object individually so check that box at the bottom of the export window and click Export.
This will export your PNGs to the same folder you saved your inkscape file in earlier. We’re not done yet though! There’s no such thing as transparent ink and MOO will turn our strokes black again so there’s one last step we must go through and that means firing up Gimp.
If you’ve never installed a Gimp plugin before – and I hadn’t – there are plenty of guides to get you going. It’s as simple as typing make in the correct directory from a terminal window. If you get stuck drop me a line but for now I’ll assume you have the batch processing plugin installed.
Once you’re in Gimp head over to the Filters menu in the top bar and select Batch Process.
This tool will pop up, in the input tab choose to add files and select the PNGs that Inkscape made for you. Then select the Rename tab and select a new output directory – we don’t want to overwrite and mess up the originals. Also select to flatten the images, this will remove the transparency for you. Lastly on the output tab choose PNG from the dropdown of file types. The Default should be fine. Hit start and you should fill your new folder with lovely print ready pictogram PNGs.
Try saying that three times fast!
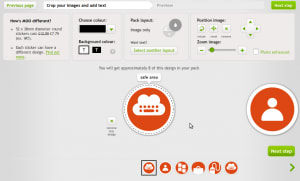
The end is in sight! All that remains is to head over to MOO’s sticker page and make your own stickers. Upload your PNGs, crop, rotate and generally play and in no time at all you’ll have some lovely stickers in your house, on your laptop, on your friend’s laptop, on your cat, basically anywhere you put them!
Enjoy!
Look out for a follow up post when mine arrive! 🙂

Ubuntu for desktops
The open source Ubuntu desktop operating system powers millions of PCs and laptops around the world.
Ubuntu is fast, modern, secure and it comes with everything you need to run your organisation, school, home or enterprise.
Newsletter signup
Related posts
In pursuit of quality: UX for documentation authors
Canonical’s Platform Engineering team has been hard at work crafting documentation in Rockcraft and Charmcraft around native support for web app frameworks...
Source to production: Spring Boot containers made easy
This blog is contributed by Pushkar Kulkarni, a Software Engineer at Canonical. Building on the rise in popularity of Spring Boot and the 12 factor paradigm,...
Spring support available on Ubuntu
This blog is contributed by Vladimir Petko, a Software Engineer at Canonical. The release of Plucky Puffin earlier this year introduced the availability of...


